Table of Content
- Step 1: Choose and Prepare the Brooder Enclosure
- Step 2: Add Bedding
- Step 3: Set Up the Heat Source
- Step 4: Add Feeders and Waterers
- Step 5: Choose the Right Location
- Step 6: Add Enrichment and Maintain Cleanliness
- Step 7: Biosecurity Measures
- Step 8: Common Mistakes to Avoid
- Conclusion: Set the Stage for a Healthy, Happy Flock
- About the Author
Bringing home baby chicks is an exciting milestone, but it also comes with responsibility. Without a mother hen to provide warmth, comfort, and protection, it’s up to you to recreate a safe environment where chicks can thrive. Whether you’re a backyard beginner or setting up your first brooder, this chick brooding guide walks you through each step to create a warm, clean, and secure space that supports healthy growth. If you're starting from hatching, be sure to read our guide on properly incubating poultry eggs to give your chicks the best possible start before brooding. For those expanding into other poultry, explore our detailed article on how to raise turkeys for meat or backyard flocks.
From enclosure selection to feeding, heating, and maintenance, we’ll cover every detail so your chicks get the best possible start. Let’s begin.
Step 1: Choose and Prepare the Brooder Enclosure
A brooder is a secure, contained area designed to mimic the warmth and safety of a mother hen. You can use many common items to build your own brooder, as long as the space is predator-proof, easy to clean, and appropriately sized.
Best Containers for a Chick Brooder
- Plastic storage totes – Inexpensive, washable, and portable. OK for small indoor broods, but not ideal long-term.
- Stock tanks – Ideal for housing larger flocks securely.
- Kiddie pools – Roomy and easy to set up indoors, but must include a tall barrier or mesh cover to prevent chicks from escaping.
- Cardboard boxes – Not recommended for long-term use. Temporary only for very small indoor broods.
- Puppy playpens or rabbit hutches – Secure and repurposable. Ensure flooring is safe and cleanable.
- Outdoor brooder houses – Typically raised with hinged sides. Not safe without predator-proofing.
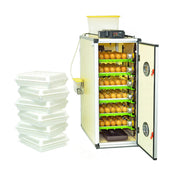
👉 Consider upgrading to a Cimuka Chick Brooder for a stackable, hygienic, and scalable brooding solution.
Brooder Size Guidelines
- 0–4 weeks: 6 inches per chick
- 4–8 weeks: 1 sq. ft. per chick
- 8–12 weeks: 2 sq. ft. per chick
- Use cardboard dividers if the brooder seems too large initially; remove them as chicks grow.
Safety Tips
- Wall height: At least 18 inches to prevent chicks from escaping
- Covering: Use hardware cloth or a secure lid to protect against predators.
- Ventilation: Ensure airflow without direct drafts
- Stability: Avoid flimsy materials that can tip or collapse
Step 2: Add Bedding
Bedding is more than just flooring—it provides traction, absorbs moisture, and keeps chicks warm and dry.
Recommended Bedding Materials
- Large flake pine shavings – Most common and effective
- Hemp bedding – Eco-friendly and highly absorbent
- Paper towels or puppy pads – Useful for the first few days
Avoid:
- Newspaper alone (slippery, causes leg problems)
- Cedar or cypress shavings (release harmful oils)
Start with at least 1 inch of bedding and increase to 3–6 inches as needed. For odor control and dryness, use products like Coop Recuperate™.
Step 3: Set Up the Heat Source
Young chicks need consistent warmth, as they cannot regulate their body temperature until fully feathered (around 5–6 weeks old).
Temperature Guide for Baby Chicks
| Week | Temperature |
|---|---|
| 1 | 95°F (35°C) |
| 2 | 90°F (32°C) |
| 3 | 85°F (29°C) |
| 4 | 80°F (27°C) |
| 5 | 75°F (24°C) |
| 6+ | Room temp (if fully feathered) |
Types of Heat Sources
-
Heat Lamps
Economical but must be installed securely. Always use shatterproof red bulbs. -
Radiant Heat Plates
Safer and energy-efficient. Simulates a mother hen's warmth. -
Heating Pads
Used for “heating caves.” Lower fire risk, but monitor closely.
How to Tell if Chicks Are Comfortable
- Too Cold: Huddled, cheeping loudly
- Too Hot: Panting, avoiding a heat source
- Just Right: Moving freely, exploring, evenly spread
Step 4: Add Feeders and Waterers
Your chicks should have constant access to clean water and feed.
Feeders
- Use a small trough-style feeder with dividers to reduce waste
- Offer non-medicated chick starter feed (18–20% protein)
- Add First Peep™ to support gut health
Waterers
- Choose narrow-lipped chick drinkers to prevent drowning
- Poultry nipple waterers reduce contamination
- Add electrolytes like Chick E-lixir™ for hydration and energy
Position feeders and waterers outside the heated area, elevated to avoid bedding contamination.
Step 5: Choose the Right Location
Where you place your brooder directly affects chick health and maintenance.
Indoor Brooding
- Best for small numbers and temperature control
- Expect feather dust—use furnace filters or shop vac setups
- Choose a low-traffic room with stable temperature
Outdoor Brooding
- Keeps dust out of the house
- Allows acclimation to natural conditions
- Requires predator-proof setup and strong walls (hardware cloth)
Regardless of location:
- Avoid direct drafts
- Provide natural or artificial light
- Ensure chicks get at least 8 hours of darkness unless using red heat lamps
Step 6: Add Enrichment and Maintain Cleanliness
Chick Enrichment
- Add small perches (branches or rods)
- Allow short outdoor excursions in mild weather
- Provide mirrors or pecking toys
Daily Maintenance Checklist
- Clean feeders and waterers 1–2 times daily
- Remove wet or soiled bedding
- Check for health issues: pasty butt, lethargy, crooked toes
- Talk to your chicks—they’ll associate you with safety
Step 7: Biosecurity Measures
Protect your chicks from disease with strong preventative practices.
Biosecurity Best Practices
- Wash hands before and after handling chicks
- Change clothes/shoes if coming from other flocks
- Quarantine new or sick birds
- Keep brooder separate from mature chickens
Step 8: Common Mistakes to Avoid
- Use a heat lamp with a shatterproof red bulb to maintain warmth safely
- Feeding adult layer feed to chicks causes calcium overdose
- Ignoring pasty butt can be fatal if untreated
- Underestimating predator risk—even pets can be dangerous
- Using slippery newspaper bedding leads to leg injuries
Conclusion: Set the Stage for a Healthy, Happy Flock
A properly prepared brooder can make the difference between a healthy flock and avoidable losses. From temperature control to clean bedding, every detail matters.
Whether you're raising layers or meat birds, your early efforts will be rewarded with strong, social, productive chickens.
Ready to set up your brooder? Browse our curated Brooding Collection for tools and supplies that simplify every step.
About the Author
Umair Salahuddin is an experienced poultry care enthusiast and a contributor to HatchingTime.com. With years of hands-on experience raising chickens, Umair offers expert advice on chick care, brooding, and raising healthy poultry.