Are you staring at your incubator, wondering if your upcoming quail flock will hatch successfully, or if you’re about to experience a low hatch rate? Whether you are a backyard homesteader looking to maximize your meat production or a passionate quail hobbyist aiming for those beautiful celadon eggs, choosing and testing your incubation equipment is the single most critical decision you will make.
This article breaks down a real-world pre-season test hatch using the premium Cimuka CT180 Hatching Time Incubator. I am going deep into its performance, looking closely at the automated systems, and giving you an honest look at moving those fragile, freshly hatched chicks into a multi-tier brooder system without losing your sanity—or your chicks!
Why I Ran a Test Hatch with CT180 Before the Main Season
Checking the Setup Before the Main Production Rush
I prefer to run a test hatch before the busiest part of the breeding season. It gives me a chance to see how the equipment behaves before I am working with a much larger number of eggs. I don't want to find out that a heating element is struggling or a humidity sensor is miscalibrated when there are hundreds of rare or premium eggs loaded up.
For my first hatch with this equipment, I loaded the CT180 cabinet incubator with a mix of eggs collected right here at Undique from both my younger and older breeder birds. Testing eggs from different flock dynamics gave me an excellent baseline for fertility and equipment accuracy before rolling out large-scale production.
First Impressions of the CT180 Egg Incubator
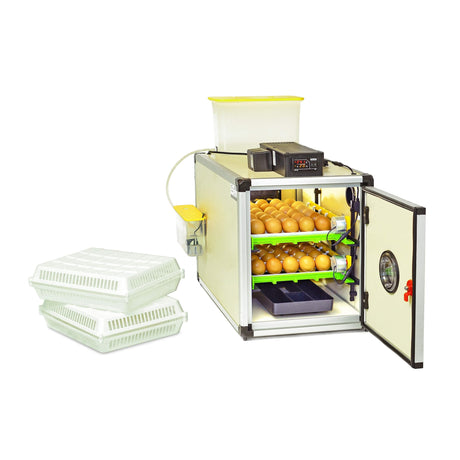
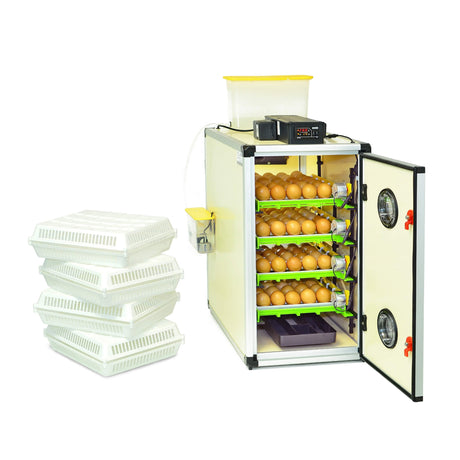
Right out of the box, the CT180 stands out compared to standard desktop still-air units. This cabinet-style incubator is designed for serious volume while maintaining a remarkably user-friendly footprint. One feature I appreciated immediately was the clear front doors. I could check what was happening across the different levels without opening the incubator every few minutes. Once I started hearing the first tiny peeps from the baskets, that became especially useful.
First Hatch of the Season with the CT180 Hatching Time Incubator
How Automated Turners and Humisonic Control Worked During This Hatch
Automatic Turning for Quail Eggs
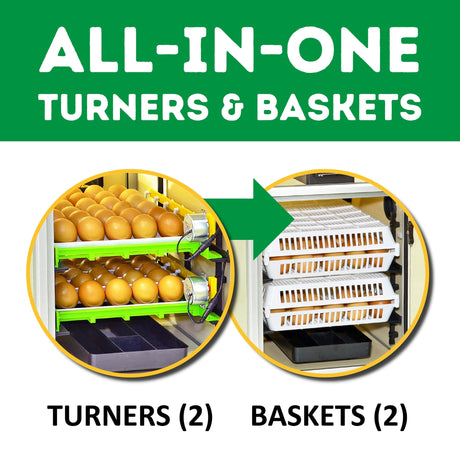
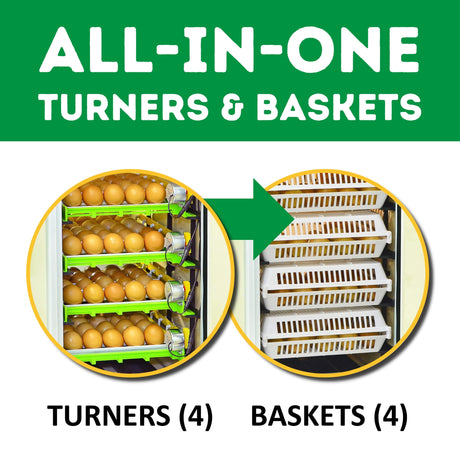
One of our core philosophies at Undique is eliminating manual, repetitive tasks through reliable automation. The CT180 eliminates the tedious task of hand-turning eggs with its robust automatic turning racks.
For quail eggs, which require consistent, gentle rotation during the first 14 days of incubation, the mechanical reliability of this system means fewer cracked shells and healthier embryo development. The trays hold the eggs securely, ensuring that even the smallest Coturnix or Celadon eggs stay positioned correctly throughout the rotation cycle.
| Quail Incubation Timeline | |
|---|---|
| Days 1 to 14 | Active incubation and automatic egg turning |
| Day 14 | Lockdown phase: stop turning and increase humidity |
| Days 17 to 18 | The hatch begins |
The Humisonic Humidity Solution
Achieving precision humidity can make or break a quail hatch. Too dry, and the chicks shrink-wrap inside the shell; too wet, and they can drown before pipping. The CT180 utilizes the advanced Humisonic humidity control system, which automatically vaporizes moisture based on real-time digital sensor data.
Even when placed in a cool basement environment with ambient humidity hovering around 44% to 50%, the Humisonic system didn't have to overwork itself. It maintained a stable environment inside the cabinet, allowing me to hit my target metrics effortlessly.

Step-by-Step: Moving Day from Cabinet to the Hatching Time Brooder
Managing the Hatch Safely
When days 17 and 18 arrived, the action happened fast! Opening the cabinet revealed a bustling world of tiny, energetic fluffballs. During this test hatch, I pulled a beautiful batch of healthy chicks, including several from our Celadon lines.
To keep things perfectly organized, I utilize a digitized hatch report card. By scanning the card with a mobile phone, I instantly log our hatch rates directly into our automated tracking system, QuailOS. This historical data ensures we keep our flock genetics and fertility tracking razor-sharp.

Getting the Brooder Ready Before I Open the Incubator
In professional culinary spaces, chefs use the term Mise en place (or as I like to call it, “Mison plus”), which simply means having everything prepared and handy before you begin your work. This term aligns with this part of the process: When transferring chicks, your “Mison plus” must be flawless to prevent the babies from chilling.
Before opening the incubator doors, I ensure the transfer baskets are ready, and the multi-tier brooder is fully prepped. I love using simple, reusable plastic gripper shelf liners from the local store inside our sorting baskets. They are incredibly affordable, provide excellent footing so the tiny chicks don't suffer from splay leg, and can be easily washed, sanitized, and reused for the next hatch round.
Real-World Tips, Tradeoffs, and Common Mistakes
Why I Do Not Rely on Paper Towels for Long
A very common piece of advice in backyard quail groups is to line your hatching trays or brooder floors with paper towels. While well-intentioned, I found this is actually a common mistake!
In high-humidity environment settings, paper towels act like a giant sponge, soaking up vital moisture from the air and creating cold, soggy spots right under your chicks' feet. Stick to high-traction, non-absorbent shelf liners or specialized floor grates to keep your chicks dry, warm, and stable.
Managing the Infamous “Water System Floods” for old models
When transitioning your chicks into a professional multi-tier brooder system like the Hatching Time 3-Tier or 5-Tier brooder setups, pay absolute attention to your automatic water lines in the back. A frequent complaint from beginners online is that the water cups or nipples leak and flood the brooder trays.
Ninety percent of the time, this isn't an equipment failure but a height adjustment issue. As your birds grow, you must continuously adjust the height of the watering system. If the water line is too low, the chicks will lean on the trigger mechanisms, use it as a perch, or splash around playfully, filling your waste and poop trays with water. Keep the system adjusted so they have to reach up slightly to drink.
Watch Out for the Drafts and Floating Feathers
Cabinet incubators move a lot of air to maintain uniform temperatures. When you open the doors of the CT180 to pull your hatch, you will be greeted by a flurry of tiny, floating dander feathers.
To prevent these micro-feathers from blowing all over your workspace or being inhaled, I place a clean, damp towel over your collection baskets. This captures the dander instantly and helps keep the immediate temperature drop to a minimum while you count your new flock members.

My Verdict
The CT180 Hatching Time Incubator paired with their specialized multi-tier brooder systems is an absolute game-changer for serious homesteaders, commercial breeders, and backyard farmers who want high hatch rates without the exhausting manual labor. Its automated turning and advanced Humisonic humidity controls take the stress out of the delicate 18-day quail cycle.
While small tabletop incubators are completely fine for casual hobbyists running a dozen eggs at a time, anyone looking to expand their production, improve biosecurity, and maintain pristine tracking needs to invest in heavy-duty, cabinet-style automation. It saves time, drastically reduces chick mortality, and turns what used to be a stressful chore into an automated, joyful science.
Written by:

Christian